Feeds:
Posts
Comments

The Dragon Racer

7 years ago, a young and eager Kevin discovered the joys of dragon boating after moving to California. It’s been his passion, exercise routine and preferred method for meeting girls (that is, until we met. Then the fat lady sang on the ladder). Nowadays, Kevin is a coach for his beloved team, the Killer Guppies. And after weeks of training, that time of year came again… the Long Beach Dragon Boat Festival!

Kevin spent the weekend with his fellow paddlers, determined to race hard, bring home some medals and represent Southern California in the sport.That’s him in the front, with the bright orange visor 🙂

Being robbed of his juice box during some down time.

Serious Kevin.

Silly Kevin.

Winning Kevin!

Congrats to the Killer Guppies for kicking butt this past weekend 🙂

Any Chinese kid raised in the restaurant scene knows the classic and almighty Crab Rangoon. I remember devouring these babies like potato chips after school. You can’t just have one 🙂 But while it was thoroughly delicious, I personally blame crab rangoons for single-handedly turning me from a seemingly adorable child into a fatty.

Even though we have a mini fryer at home, having a health nut of a hubby prevents it from being used very often… Which is fine with me, because I’d fry everything if possible (and die an early death). With leftover cream cheese and crab meat sitting in the fridge, my first thought was to remix the Chinese-American classic as a healthier appetizer for tonight’s dinner. Baked, not fried.

This was so easy and fast that Kevin, who normally discourages me from making appetizers for guests, actually suggested we make it at our next party! Whenever that’ll be… It ends up being 80 calories per crab rangoon after doing the math. Not exactly a “light” snack, so imagine what the calorie count would be if it was fried and not baked! Yikes! Childhood chubbiness, explained. Eat with caution and enjoy 🙂

1 small 8 oz. tub of whipped cream cheese (or room temperature/softened cheese is fine)
1/2 cup chopped crab meat (I used imitation)
1 stalk green onion, chopped
1/2 teaspoon salt
1 package of store-bought wonton skin
1 egg

Mix the cream cheese, chopped crab meat, green onion and salt in a bowl. Beat the egg and place it to the side. This will be the sealant for the crab rangoon. Scoop a small spoonful of the rangoon mixture and place it in the center of the wonton skin. Rub the egg mixture along the edge of the wonton skin and fold into a triangle. Press down on the edges to make sure it’s sealed. Voila! Makes about 15 crab rangoons. I line my pan with baking sheet to avoid sticking. Bake at 400 degrees for 12-15 minutes. Best served with some kind of sweet or plum sauce.

Think me vain or victim of early mid-life crisis, but I don’t want motherhood to turn me from a youthful, style-conscious woman into a frumpy mess, with no time to take care of myself. That’s how I’ve been feeling these past 34 weeks of pregnancy… Lack of motivation, energy and reason to make myself presentable. Looking at pictures of myself from just 2 years ago, one has to wonder, “Who the heck is that??”

I’m thankful to have had a safe and healthy pregnancy thus far (and hope it continues to birth), but my self esteem has taken a beating. Gaining 40lbs and being super uber swollen all the time is NOT a fab feeling. This has been somewhat of a “scared straight” experience to motivate me to work my ass off after Baby Chan arrives to look and feel great again. It’ll be a challenge, since availability of time and energy will be dictated by his needs, but one I’m ready to take on.

STEP 1: Little things can be done right now towards looking like a stylish mom. A cool diaper bag is a necessity. After all, that will be my primary accessory for the next few years. It doesn’t, however, have to mean paying a ridiculous amount of money for one. Smart spending is always in style 🙂 So after drooling over the Petunia Pickle Bottom bag of the woman who sat next to me in the OB waiting room, I decided to find my cheaper alternative. And perhaps one that doesn’t scream diaper bag.

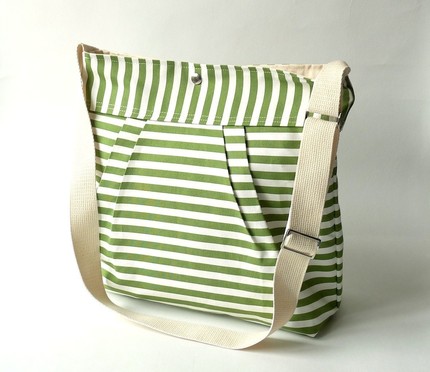
Etsy.com is my favorite site. It’s like Ebay for unique and stylish people 🙂 After browsing for almost 2 hours, I decided on this nautical, somewhat gender neutral piece, made in Paris by a fellow mom and bagmaker. It’s made of full lined french heavyweight 100% duck canvas (whatever that means) and can be used as a shoulder or messenger bag. Even after shipping from Europe, this beauty only cost $55! Woot woot! Can’t wait to get it…

Excited from my purchase, I decided to get crafty and make my own travel changing kit on the cheap, instead of paying more for a generic one from Babies R Us. Let me tell you, it was TEDIOUS!!! Especially since I didn’t have a tutorial or manual to go by and had to figure everything out myself. The good news is I finally learned how to thread the sewing machine on my own (since Kevin wasn’t around to help this time). It’s machine washable and will hopefully last awhile 🙂 This was my project for the week.

It features the green from my diaper bag, but also adds interesting designs and color elements. I especially love the wooden faux button 🙂 The changing pad is actually held closed with velcro. And when open, the bottom is a big pocket, to hold diapers and wipes. I spent $13 on all materials and have a yard of fabric left to do something else… decorative pillow perhaps??? HMMMM…

Great as a dessert or breakfast. The only thing that could make this easy dish better would be a dash of rum and/or scoop of vanilla ice cream 😉

INGREDIENTS
4 eggs
1  2/3 cups milk (skim or plain soy)
1/2 cup sugar
1/4 cup unsweetened cocoa powder
1 tsp vanilla
1  1/2 to 2 bananas
7 to 8 slices of whole wheat bread
1/4 cup chocolate chips

DIRECTIONS
Cut the slices of bread into bite sized cubes. Cut the two bananas into similar sized pieces.

Put the bread and bananas into a 8×8 baking pan making sure the bananas are spread throughout the pan. In a large bowl combine the eggs, milk, sugar, cocoa powder, and vanilla. Pour the liquid mixture over the bread and push the bread down so that everything goes down into the liquid mixture. Let this soak together for at 15 to 20 minutes.

Bake at 350 degrees F for 25 minutes covered and 15 minutes uncovered.

Cream Puff Power!

I had my first cream puff at age 25 in Boston, courtesy of Beard Papa’s and Kevin. Amazing, what a sheltered life I lived prior to getting together with him… Kevin that is, not Papa.

With a borrowed professional mixer (courtesy of Dave), I recently picked up the hobby of baking. Great for the taste buds, hazardous for the love handles haha.

I looked up how to make cream puffs (choux à la crème, if you wanna be fancy) this week, out of curiosity, and was surprised at how SIMPLE it was! And yet, my first go at it wasn’t a success… the inside was still dense and my personal food critic demanded “MORE SUGAR!” in the cream, which is ironic because he normally avoids icings and creams for the exact reason.

When making cream puffs, it’s important to time the baking carefully. An undercooked puff results in a dense puff (damn my impatience!), which makes it hard to fill with cream. And it’s definitely not something you can pop back into the oven and fix. My second go at mastering the cream puff was successful, so here I am, sharing it with you 🙂 It’s so easy that I have to hold back from making batches after batches!
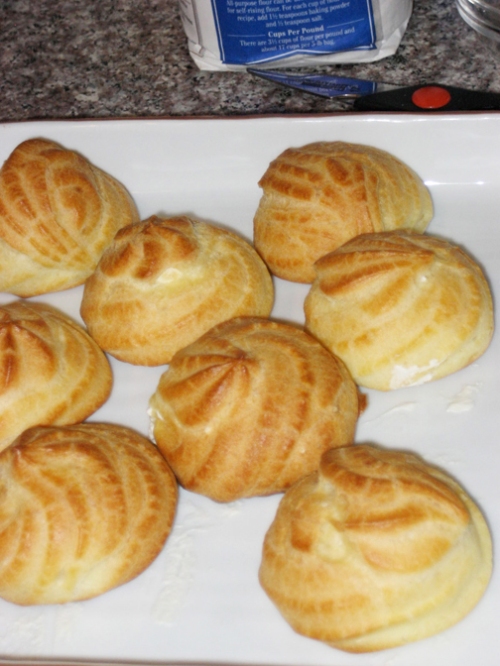
“THE PUFF”

1 cup water
1/2 cup butter (4 ounces)
1 cup all-purpose flour
1/4 teaspoon salt
4 large eggs

1. Preheat the oven to 400 degrees Fahrenheit.

2. In a small bowl, whisk together the flour and salt.

3. Bring the water to a boil in a medium-size saucepan over medium-high heat.  Add the butter.  When the butter has melted, add the flour mixture all at once and stir vigorously.  Cook and stir until the mixture forms a ball that doesn’t separate.

4. Remove from the heat and cool slightly (about 1 minute).  Add the eggs, one at a time, beating after each one until the dough is smooth.

5. Drop heaping tablespoons of dough about 1-inch apart onto a greased baking sheet.  Or transfer the batter to a pastry bag with a round tip and pipe circles about 2-inches in diameter and about 1-inch apart onto greased baking sheets.  If the puffs are medium-size (makes about 16), bake for about 30-35 minutes, and if the puffs are mini-size (makes about 4 dozen), bake for about 20-25 minutes.

To test, just take one out of the oven and open. It should feel really light, which indicates the center is fully cooked and “empty”. Remove the cream puffs from the oven and cool on a cooling rack.

CREAM FILLING

I chose to make my own cream filling (adapted from the Coconut Lychee Chinese Cake), but you can also use whipped cream or custard, ready-made, from the grocery store.

2 cups heavy whipping cream (must be cold)
1/2 tsp vanilla extract
10 tablespoons confection powder sugar

Using the electric mixer, beat cold whipping cream. Just when it gets soft and billowy, slowly and very gently add sugar and extract then beat to stiff peaks.

If you want to spice things up by adding flavor to your cream, try fusing a few tablespoons of pureed strawberry or even matcha powder, for a green tea taste. Or go wild with another flavor! I actually used a pack of powdered “green tea milk tea” mix first time around because it was handy, and it tasted great 🙂

I placed the cream in an icing bag and filled each puff from the bottom, although I recommend filling it from the side or even top, so it doesn’t squeeze out onto your lap when it’s bitten into. You can also fancy up the puff by dipping it in chocolate or topping with powdered sugar. Mine were simple (this time around) because Kevin wanted his dessert ASAP haha.

Here he is, tearing that cream puff up like it committed a crime 🙂 Look at all that cream!

Movin’ On Up!

Congratulations to “The New Daddy Chan*” for getting his certification as a Professional of Human Resource! It’s official… he knows what he’s doing! 🙂 I’m so proud of Kevin for studying so hard and adding some letters to his name. Literally!

Kevin Chan, PHR

Impressed? 🙂 I am. And to celebrate his accomplishment, I tried my hand at making some Green Tea Cream Puffs.

The recipe isn’t quite perfected yet. When it is (probably within the next 2 weeks), I’ll share it with everyone 🙂 Here’s Kevin, munching on his prize while watching an apparently enthralling episode of Myth Busters.

* The man formerly known as Daddy Chan has been promoted to Grandpa Chan, as Kevin so kindly pointed out after a previous post. He is now the official Daddy Chan. See him in all his glory.

I’m exhausted after a day of baking. From scratch. For the first time. All that’s left to say is, “YUMMM!!!” Lychee coconut Chinese sponge cake anyone?

CHINESE CAKE INGREDIENTS

8 jumbo eggs
1 cup sugar
1 cup cake flour
1/3 cup oil
1/2 water
1 tsp baking powder
1/2 tsp cream of tartar

1. Separate the egg yolks from the whites. Put the yolk in a mixing bowl and the whites into another mixing bowl. Make sure not to break the yolk. If there is any yolk in the egg whites it will not work. Put the cream of tartar into the egg whites and beat them with a hand mixture. This will fluff the egg whites. To test when the egg whites are ready, stick the mixer paddles into the fluff and if the fluff doesn’t run off the paddles then it is ready.

2. Preheat the oven to 350F and put the bunt pan in the oven.

3. Set the fluffed egg whites aside. In the mixing bowl with the egg yolks combine the other ingredients in the following order: sugar, cake flour, baking flour, water, oil.

4. Take a large dollop of egg white and FOLD the egg white into the mixture. Fold the rest of the egg white into the mixture accordingly.

5. Remove hot bunt pan from the oven and fill. Bake for 40 minutes to 1 hour. Check to see if the cake is done by inserting a kebab stick. If batter pulls out sticky, it’s not ready.

6. Remove cake from the oven and turn it upside down and let cool.

LYCHEE CREAM FROSTING INGREDIENTS

2 ½ cups heavy whipping cream (must be cold)
1/3 cup lychee puree
1/2 tsp vanilla extract
5 tablespoons confection powder sugar

Using the electric mixer (whisk attachment), beat cold whipping cream. Just when it gets soft and billowy, slowly and very gently add lychee puree in 3 to 4 additions, sugar and extracts then beat to stiff peaks.

ASSEMBLY
1 cup fresh shredded coconut
1 cup of fresh lychees, pitted, drained and patted dry. (Reserve juices)
¼ cup of lychee syrup or if unavailable, simmer lychee juices with sugar to make a light syrup. Lychee liquer if available is also a good substitute.

Brush each angel cake layer lightly with lychee syrup, being careful not to brush on too much as it would make the cake soggy.

Fill the layers with whipped lychee cream and fresh lychees, and then frost the entire cake. with the whipped cream. Sprinkle dessicated coconut liberally over the top and sides of the cake.

Striking a Pose

This is so exciting to share!

Kevin and I participated in a maternity photo session yesterday, thanks to our awesome friend, Rich, who was so generous in offering his time for the occasion. He’s a really talented photographer and we felt so honored to be his subjects 🙂 So Kevin and I sucked in our cheeks (well, me), puffed out our chest (and belly) and struck a pose. Several, actually. And less than 24 hours later, here are a few of my favorite results:

Kevin and I bought a used glider/ottoman set off Craigslist a few months ago, for our nursery. The upholstery was appalling (to put it mildly) but the price sure was attractive at $40. My intention was to have the glider reupholstered by mommy dearest next time she came (hehe, I’m notorious for creating “to do” lists for parental visits). But after looking at the ugly fabric for months and not being able to stand another day of it, I decided to woman-up and give this project a try today. After all, I’m grown and about to become a parent myself. Can’t rely on my mom forever. With that decision made, I skipped over to Joanne’s for some fabric shopping while Kevin got to work setting up the sewing machine (how sweet of him). Here he is, learning how to line up the string 🙂

I was surprised to discover whoever reupholstered before took the time to make zippers and all, so removing the covers was very easy. But what I found underneath the covers was even more hideous. Eeeks! Had to step back for a second and wonder if I was better off to have purchased a new one. Bah!

The seat of the glider was so squished from years of sitting that I traded the pad from the ottoman (which was in much better shape) with the seat pad. My hope was to make this reupholstering project as simple as possible, since I don’t know much about sewing. And surprisingly, it was. Within less than 2 hours, I had this:

I wish the pattern was larger, for a more chic impact, but Joanne’s fabric selection isn’t the best and this was the best I could find. Proud of myself for a job well done, I decided to take it one giant step further and add an owl themed back pillow (the nursery’s theme will be owls and the forest). My favorite site for creative research is Etsy.com and a quick search for “owl pillows” produced a few samples to go off of:

These are super cute, but not very functional. I needed a short, wide pillow for lower back support, and took off making my “revised” version to fit this need. Between the glider ($40) and the new upholstery fabric ($21), cost was rising and I wasn’t prepared to make another run to Joanne’s. A quick scan of our house produced several fabrics that could be repurposed for this project. Mainly, Goodwill-destined clothes that we hadn’t gotten around to dropping off yet. Horray!

I cut an old tank top up for the pillow itself and started creating it’s face with other old shirts we had. I swear, we’re pack rats!!! But apparently, that comes in handy sometimes haha. We got stuffing from a decorative pillow I bought last summer that Simba chewed up within 2 days and we never bothered to throw away. And to tie it all together with the glider, I used leftover scrap fabric for the owl’s chest. Voila! My first attempt at an owl pillow.

If you have a creative mind (or just squint a little), you can make out an owl resemblance. What an exhausting project! It took about 5 hours to do, so basically, the bulk of my Saturday.

Next project: OWL MOBILE!

Some of you may have wondered why my posts have dwindled over the weeks. Others may not have noticed… or cared (I choose not to think the latter). Surprisingly, NO, I haven’t lost interest in this blog. In fact, being able to share our productivity and improvements with you all has been somewhat of a driving force (behind me, at least) to keep working on our various projects! And for the past few weekends, Kevin and I have been busy transforming our Little Yard of Horror into a decently landscaped space – just in time for summer pool parties and our baby shower 🙂

The only area of our home that Kevin and I have utterly avoided in our almost 2 years here has been the back yard, for multiple reasons. The main one being:

It’s not visible from the street, so the need to beautify wasn’t high in priority. But considering the back yard is a huge part of our overall home, that way of thinking just isn’t right (in retrospect). I compare it to a beautiful woman who doesn’t brush her teeth.

So in preparation for good times this summer (and another big event that we’ll announce at a later time), Kevin and I have been working semi-diligently these past few weeks in preparation. He does most of the work while I supervise with a glass of water in hand. The few perks of being pregnant :-p

Here are photos of the BEFORE.

I went crazy with buying outdoor furniture last summer and we now have 3 sets of tables and chairs,  most of which have been neglected since it was last used… last summer. And that monster of a bush you see above? It’s an out of control rose bush (which we discovered to be 3 rose bushes after chopping it down) that the previous owner left for us to take care of. I never realized roses could grow like weed! I tried to salvage it at first, clipping meticulously for an hour before realizing the tangled branches were too much to handle and we’d have to start from scratch. And speaking of weeds, fallen leaves and weed pretty much dominate our entire landscape – front yard and back.

Our back yard has the potential to be really nice if someone would give it some lovin’. There’s a nice waterfall at the far end of our pool, but it’s not that beautiful when situated next to this strip of mess.

These 2 photos only depict HALF of our back yard. And as you can see, it’s a mess. One day we’ll be able to afford a gardener 🙂 Until that day arrives, Kevin and I will have to maintain this ourselves.

Since it’s still a work in progress, I won’t post AFTER pictures just yet. Instead, here’s a sneak peak at what we’ve added so far. The big unveiling will come next month, after the other plants have had a LITTLE time to grow in size.

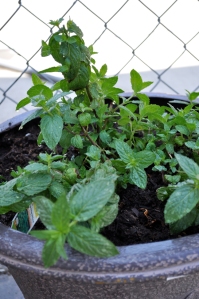
Our own pot of mint! Daddy Chan planted this in April and it’s grown quite a bit since. Now we have herbs for yummy Vietnamese food, right in our back yard! I’ve gone back and forth for weeks, contemplating whether or not I have enough commitment to maintain an urban vegetable garden. For some reason, I really want home grown tomatoes. We’ll see on that one.

And there you have it… the latest news on our latest project 🙂 Kevin and I are also working on other stuff, so keep an eye out for more blogs!